While researching for my last post about the plasma arc audio speaker, it got me waxing nostalgic about the 555 Timer Integrated Circuit, one of the most versatile ICs ever designed. The Plasma Arc Audio Speaker I wrote about was one of the coolest things I have ever seen built around a 555, which is a favorite and classic chip that first hit the silicon scene in the 1970s. Read more
Living in North Texas. I have been seeing plenty of electrical arcs lately, due to the unprecedented storms we have been having through the month of May. A few of these arcs have been destructive — one of our sound system amps at our church started billowing out acrid smoke about the same time that we had a very close lightning strike, another local church took a direct hit a few weeks ago, and just the other day my friend Roger KE5YTA lost a radio power supply due to a very close strike. Another friend, Don AE5DW in Louisiana took a direct strike two weeks ago and basically lost everything electronic in his house.
555 Timer IC (Wikimedia Commons photo)
Aside from the sights and smells that lightning and electrical arcs can create, they usually make a loud and obnoxious noise. That’s why I was impressed when I saw the DIY Plasma Speaker on Instructables today. Instructables member [tanner_tech] used a classic 555 Timer IC and a flyback transformer, high-voltage mosfet, and a fast diode from an old TV to make music. Literally, you plug in any sound source and it creates (surprisingly) high quality audio from about a one inch high voltage electrical arc. Visit the Instructable here and watch his YouTube video below — if you want to skip the technical stuff the music starts at about 3:10. Then you just might want to go back and watch the technical stuff.
Some of the members of our Hamvention group – Joe KØNEB, Bill AD8BC, Bob KA9MDP, Kristen KB3OQV, Gregg N8ONW, and Brad W8PAL — in the flea market at Hamvention 2015 (Photo Credit: N5KH (I think))
Another Hamvention has come and gone! This was my 11th Dayton Hamvention, my first having been in 2005. I decided after my first that this would be an annual thing for me and so far this goal has been met. And so far I haven’t been disappointed. This was also a special year for me because my Bob KA9MDP, my “Elmer” from 25 years ago, was able to attend, along with a few of my other friends from Dallas–Will N5KH, James N5BKL, Max N5BSA, Ken N2VIP, and Dhiren K5FPP. I saw a bunch of other friends from Michigan and Indiana as well. It was a great time and, as always, it went by quickly. Read more
Hamvention 2015 officially ended this past Sunday at 1:00 PM EDT. (watch my blog for a hamfest review in a few days). In my opinion, it was a great show. There were only seven to nine (depending on who you ask) open vendor booths inside, the outdoor vendors and attendees looked to be about on par with last year. There was no poop volcano, the stands didn’t collapse during the closing ceremonies, ceiling tiles didn’t fall on people (although some had fallen in the year since Hamvention 2014, so that was a distinct possibility). There was, of course, the unfortunate audio problems during the prize draw (the fault of which may have either been the DARA microphone/cable or the Hara Arena sound infrastructure. I’d guess the latter.) There were reports of some thefts from the flea market vendors but that happens every year. Most aggravating were the reports of cars getting broken into that were parked in the big yard at the private residence across Basore Rd. Anyway, come Sunday evening, the flood of complaints began (as they do every year) on the Hamvention Facebook page, followed by the rash of half-assed suggestions. So I, your humble host, posted “AD8BC’s guide to successful and intelligent Hamvention complaining.” Thought it should be posted here for easy reference: Read more
Let me start with the history of the handheld radios that I have owned, and then I’ll get into my ideas of combining existing and new features into “my” perfect HT. WARNING: This is a long article. Scroll down to Part 2 if you want to get past my history bit.
PART 1 – MY HT HISTORY
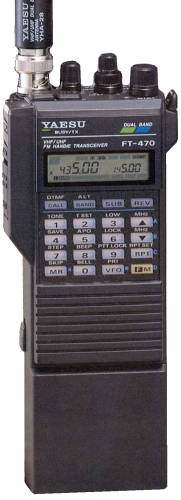
Yaesu FT-470 HT Image from hampedia.net
So I recently purchased a Yaesu VX-8DR HT package for just about $700 (this includes programming software and cable, spare high-capacity battery, quick charge cradle, speaker mic and GPS unit to enable the built in APRS). My last four HTs have been from Yaesu (FT-470 dual bander bought in the early 90s, VX-5R tri bander bought in 2000, VX-7R quad bander bought in 2006, and the new VX-8DR), and I still have all of them lying around somewhere. To me, Yaesu is where it’s at with HTs. That FT-470 was expensive when I bought it (I was in high school and anything over $100 was expensive. I’m thinking the ‘470 was close to $400, it may have been less. If Baofeng or Wouxon was an option then, I’d have probably taken it.) The ‘470 was also big. Especially when you had the good battery and the 12V charging adapter on it (picture on right is with the small battery. The big battery was about 1½ times the size of the small battery. The 12V/charging adapter fit between the radio and the battery). It was also heavy, and would make a formidable substitute for a blackjack if you held it by the rubber duck antenna. It could monitor VHF and UHF at the same time. Read more
Thorsten Singer’s FM Radio with LED Bargraph Frequency Display. Nice looking project!
Another gem from Instructables here. This time it’s an FM Receiver with a custom LED Bargraph frequency display, brought to you by Instructables user Thorsten Singer. The bargraph is cool and all, although I would probably add digits to the display to make it more tunable. However, it’s a very well thought out project and nicely constructed, and it is something that you could use every day, so it gets points here. Even the hand drawn schematic is classy.
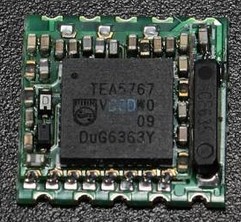
TEA 5767 FM Receiver Module (image source: banggood.com)
It’s based on a TEA5767 FM Radio Receiver module that Thorsten bought from BangGood.com, who currently lists the price of these modules at 5 pieces for $5.51 USD, which is on par with some of the current Ebay prices. The controller is an Atmega 328P chip with an Arduino bootloader (the Instructable has links to the source code as well). It appears to have four pushbutton presets, and a rotary encoder for manual tuning.
Other than adding a digital display (I’d even go with a four digit LED display in lieu of an LCD, just to add class and glow to the panel). I’d probably also add a dual LM386 amplifier circuit for the output. This thing is so cool I may actually build one!
There is a short YouTube video below that shows the operation of this receiver.
Peeling off the “Press’n’Peel” leaves the laser printer toner behind as an etch resist. (Image source: Instructables user clacktronics-uk)
So I was once again cruising Instructables and I found this excellent tutorial explaining the “Press’n’Peel” method. It has literally been forever since I have etched a custom PC board — it’s just too easy to use strip boards for those small projects (I’m a big fan of protoboards like the Adafruit Perma-Proto boards that have the same layout as a breadboard–it makes it really easy to transfer your prototype to a permanent project).
Anyway, this tutorial is pretty cool. You use a laser printer to print your solder mask to a blue sticky sheet of plastic. You then iron the sheet onto your copper. When you peel it off, the printer toner is fused to the PC board and you etch as normal.
Looks easy enough! Might have to come up with a project to try this with.
I dug this up early this morning, an NBC affiliate in the Quad Cities profiled a ham last week from Moline IL. Fran Riley of WWQC-TV6 in Davenport, Iowa spent some time with James Mayfield W9WRL and put together this story, which is one of the best news stories I’ve seen about ham radio in a long time (with the distinctive exception of this piece which is one of my favorites). Mr. Riley obviously took his time in learning about the hobby and really put together a story that made all of ham radio look good. The video features a lot of vintage gear, including the radio set that Paul TibbetsK4KVZ (SK) used on the Enola Gay when it bombed Hiroshima.
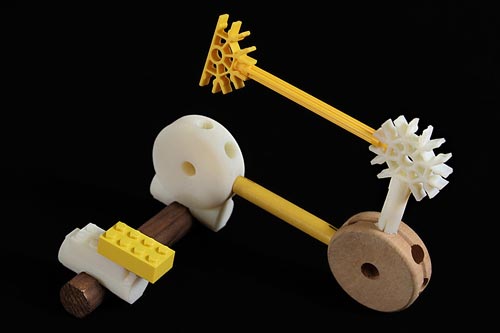
I randomly ran into this today and I thought it interesting enough to invoke a post. When I first saw it, my mind was flooded with childhood memories of all of the building toys I have ever played with (Legos, Lincoln Logs, TinkerToys….). The folks over at Free Art and Technology have published .STL files of building set adapters that you can print out on your 3D printer. That’s right, attach Legos to your Lincoln Logs. Connect TinkerToys to your Bristle Blocks (Remember those? My dad does. Specifically he remembers stepping on Bristle Blocks that I left on the floor in a dark room). This set of adapters is designed to adapt between ten (count ’em-10!) different styles of building sets, a few I haven’t even heard of, and a couple I couldn’t even find on Wikipedia (links in the list):
A childhood Maker’s dream come true! Connect all of your building toys together!
* Zoob and ZomeTool related files will be published in 2016 and 2022, respectively, to avoid patent infringement issues. However, I’m certain that someone will fill in the gap and make their own instead of waiting….
I suppose the only glaring omission in the above list could be 80/20. Wouldn’t an 80/20 to Lego adapter be wonderful?