Category Archives: Projects

Interesting Ideas: A counterpoise for your HT

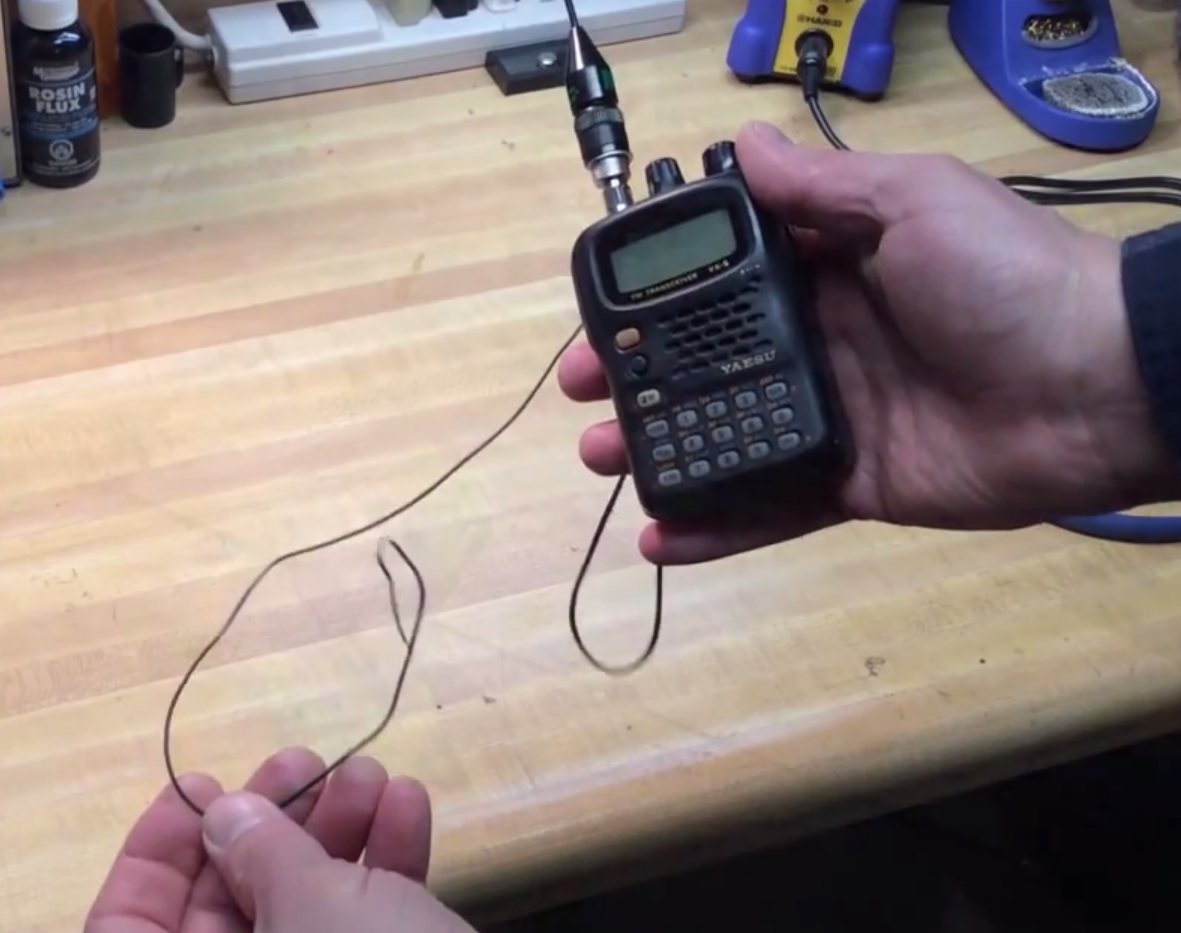
“Tiger Tail” counterpoise wire on a Yeasu VX-5 HT (hackaday.com photo)

Saw this idea earlier today on the Ham Radio Go Kits group on Facebook.  It’s called a “Tiger Tail” – something I’ve never heard of in my 26 years in ham radio.  Turns out it’s actually a thing, and not a bad idea, in theory – you attach a quarter-wavelength piece of wire to the ground side of your antenna connector on your handy-talky and just let it hang down — making your vertical HT antenna a full dipole. I’m not certain exactly how much this would improve things if you were actually holding the radio–the fact that you are holding the radio, especially if it’s made of metal, actually makes your body part of the antenna system and probably throws it off anyway.  God knows what happens to your antenna system if this thing is clipped to your belt.  But if you had the radio sitting on a wooden table, it might really help.

Read more

Electronics History: The 555 Timer

The 555 Timer IC (Wikipedia photo)

While researching for my last post about the plasma arc audio speaker, it got me waxing nostalgic about the 555 Timer Integrated Circuit, one of the most versatile ICs ever designed. The Plasma Arc Audio Speaker I wrote about was one of the coolest things I have ever seen built around a 555, which is a favorite and classic chip that first hit the silicon scene in the 1970s. Read more

Projects: Make your own Plasma-Arc Audio Speaker

Living in North Texas. I have been seeing plenty of electrical arcs lately, due to the unprecedented storms we have been having through the month of May.  A few of these arcs have been destructive — one of our sound system amps at our church started billowing out acrid smoke about the same time that we had a very close lightning strike, another local church took a direct hit a few weeks ago, and just the other day my friend Roger KE5YTA lost a radio power supply due to a very close strike.  Another friend, Don AE5DW in Louisiana took a direct strike two weeks ago and basically lost everything electronic in his house.

555 Timer IC (Wikimedia Commons photo)

Aside from the sights and smells that lightning and electrical arcs can create, they usually make a loud and obnoxious noise.  That’s why I was impressed when I saw the DIY Plasma Speaker on Instructables today.  Instructables member [tanner_tech] used a classic 555 Timer IC and a flyback transformer, high-voltage mosfet, and a fast diode from an old TV to make music.  Literally, you plug in any sound source and it creates (surprisingly) high quality audio from about a one inch high voltage electrical arc.  Visit the Instructable here and watch his YouTube video below — if you want to skip the technical stuff the music starts at about 3:10.  Then you just might want to go back and watch the technical stuff.

Published from DFW, Texas

Projects: FM radio with “old style” LED Bargraph Frequency display

Thorsten Singer’s FM Radio with LED Bargraph Frequency Display. Nice looking project!

Another gem from Instructables here.  This time it’s an FM Receiver with a custom LED Bargraph frequency display, brought to you by Instructables user Thorsten Singer.  The bargraph is cool and all, although I would probably add digits to the display to make it more tunable.  However, it’s a very well thought out project and nicely constructed, and it is something that you could use every day, so it gets points here.  Even the hand drawn schematic is classy.

 (image source: banggood.com)

TEA 5767 FM Receiver Module (image source: banggood.com)

It’s based on a TEA5767 FM Radio Receiver module that Thorsten bought from BangGood.com, who currently lists the price of these modules at 5 pieces for $5.51 USD, which is on par with some of the current Ebay prices.  The controller is an Atmega 328P chip with an Arduino bootloader (the Instructable has links to the source code as well).  It appears to have four pushbutton presets, and a rotary encoder for manual tuning.

Other than adding a digital display (I’d even go with a four digit LED display in lieu of an LCD, just to add class and glow to the panel).  I’d probably also add a dual LM386 amplifier circuit for the output.  This thing is so cool I may actually build one!

There is a short YouTube video below that shows the operation of this receiver.

Published from DFW, Texas


Projects: Masking a PC Board for etching-using the “Press’n’Peel” Method

Peeling off the “Press’n’Peel” leaves the laser printer toner behind as an etch resist. (Image source: Instructables user clacktronics-uk)

So I was once again cruising Instructables and I found this excellent tutorial explaining the “Press’n’Peel” method.  It has literally been forever since I have etched a custom PC board — it’s just too easy to use strip boards for those small projects (I’m a big fan of protoboards like the Adafruit Perma-Proto boards that have the same layout as a breadboard–it makes it really easy to transfer your prototype to a permanent project).

Anyway, this tutorial is pretty cool.  You use a laser printer to print your solder mask to a blue sticky sheet of plastic.  You then iron the sheet onto your copper.  When you peel it off, the printer toner is fused to the PC board and you etch as normal.

Looks easy enough!  Might have to come up with a project to try this with.


— Published from DFW, Texas

Projects: Arduino-controlled Solar Charge Controller

Front panel display from Pascal Foglietta’s Arduino-controlled Solar Battery Charger Controller

So I was cruising Instructables again today.  Once in a while, while weeding out the fairly boring crap like the thousand-and-one uses for Sugru or 3D printing an entire person, you find a real gem.  While I am not a tree-hugger by any remote stretch of anybody’s imagination, I am a ham radio operator, and having a good source of DC power away from any kind of commercial hookup can be important, and I have been interested in solar and battery projects on-and-off for quite a while. 

Stripboard for Pascal Foglietta’s solar charge controller

Pascal Foglietta from Sydney, Australia has put up an article–er, Instructable–about his Arduino-controlled solar battery charger controller that is a real work of art — not only the finished product itself (the protoboards, display, and enclosure are extremely professional-looking), but the documentation that goes along with it.  The instructions, illustrations, and schematics makes this project better suited for a magazine like Make: Magazine or Nuts and Volts than an Instructables article.  And while I’m getting sick of hearing about the Internet of Things (where everything you own needs to connect to everything else that you own), this project does a nice job of putting all of it’s data in human readable form on the Internet.

Here are the specifications of Pascal’s project (after the jump): Read more

Crosstown traffic: Hackaday features my “FatFingerer” on their front page

Whether this was the result of people actually liking my project or just some random randomizer picking featured projects, I saw this on the Hackaday front page this evening (and no, I wasn’t logged into my account on Hackaday, and yes, I checked this from multiple browsers to make sure this wasn’t a cookie thing…) :

Screengrab from Hackaday, 11/14/2014 7:25 PM

Screengrab from Hackaday, 11/14/2014 7:25 PM

I detailed my FatFingerer to my friends on Facebook a number of months ago, I do plan on adding a detailed writeup to my blog in the near future… I use the FatFingerer every day at work when using AutoCAD and PLC applications, the heart of it is an Arduino Leonardo programmed to emulate common keystrokes.  And yes, if you’re interested in more detail right now, here is my Hackaday.io project page for the FatFingerer.


(published from Fort Wayne, Indiana)

Projects: Software-Defined Radio with the RTL-SDR USB Stick

The RTL2832 and antenna

The RTL2832 and antenna

Yesterday I received my latest order from Adafruit — the RTL2832 Software Defined Radio USB Stick.  This nifty little device is sold in Europe as a digital TV receiver (DVB-T) for your computer.  While not compatible with the digital TV broadcasts in the US, with some additional free software, this little guy will tune into radio signals from about 24MHz to 1850MHz.  The “software” in Software-Defined Radio refers to the fact that an application external to the receiver hardware decodes the signal however you want — AM, FM (narrow or wide), single sideband, CW, etc.  The most popular Windows application (and yes, there are Linux programs available as well – the Raspberry Pi is a popular mate for this unit) for the RTL2832 is “SDR-Sharp.”  There are some more advanced applications available that will follow trunking systems and decode some digitial systems such as DMR, D-STAR, etc.  I haven’t downloaded any of these (yet).

Read more

Projects: RTL2832 Software Defined Radio and FM Stereo Transmitter from Adafruit

I just purchased a few items from Adafruit including an RTL2832 Software Defined Radio USB Stick and a Stereo FM Transmitter with RDS breakout board.  Not sure what I’m going to do with the FM Transmitter but I think it will be something like the FM Transmitter that my friend Mike Yancey KM5Z made a few years ago.  The Software Defined Radio stick will probably come with me on my travels so I can sniff the airwaves while bored in my hotel room.  Lady Ada has a good tutorial for the SDR and it looks like a lot of fun — will apparently pick up signals from 24 MHz to 1.8 GHz and supports narrow and wide FM, AM, sideband, and CW.  She also has a tutorial for the FM transmitter.  I’ll make some postings to the blog when I start playing with these things.


(published from Hagerstown, MD)